
Lutimize Screen-by-Screen Guide
Click the seven tabs below to see what each screen does and how to use it, complete with screenshots. Even first-time users can follow along with ease.
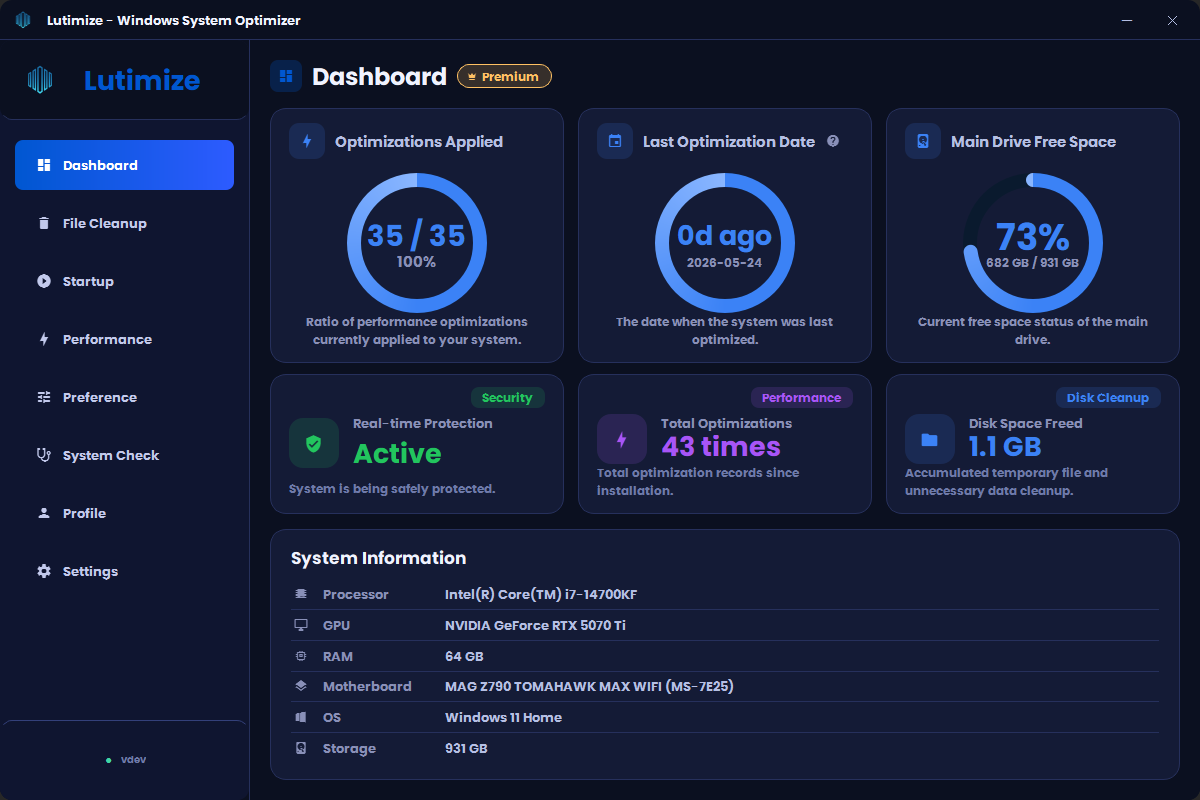
Your PC's Status at a Glance
CPU, memory, disk, and GPU information are all organized on a single screen. Color cues tell you at a glance how healthy your PC is, so you can immediately decide whether it needs cleaning or optimizing right now.
What This Screen Shows
CPU & Memory Usage
Shows in real time how busy your PC is right now.
Free Disk Space
The remaining capacity of each drive is shown at a glance with bar graphs.
Graphics Card Info
Check the model and status of the installed GPU.
Total Space Reclaimed
Shows the total disk space you've reclaimed by cleaning with Lutimize so far.
Total Optimizations Run
Shows a count of how many times you've run an optimization so far.
PC Health Status
Intuitively shows green (good) / orange (caution) / red (needs optimization).
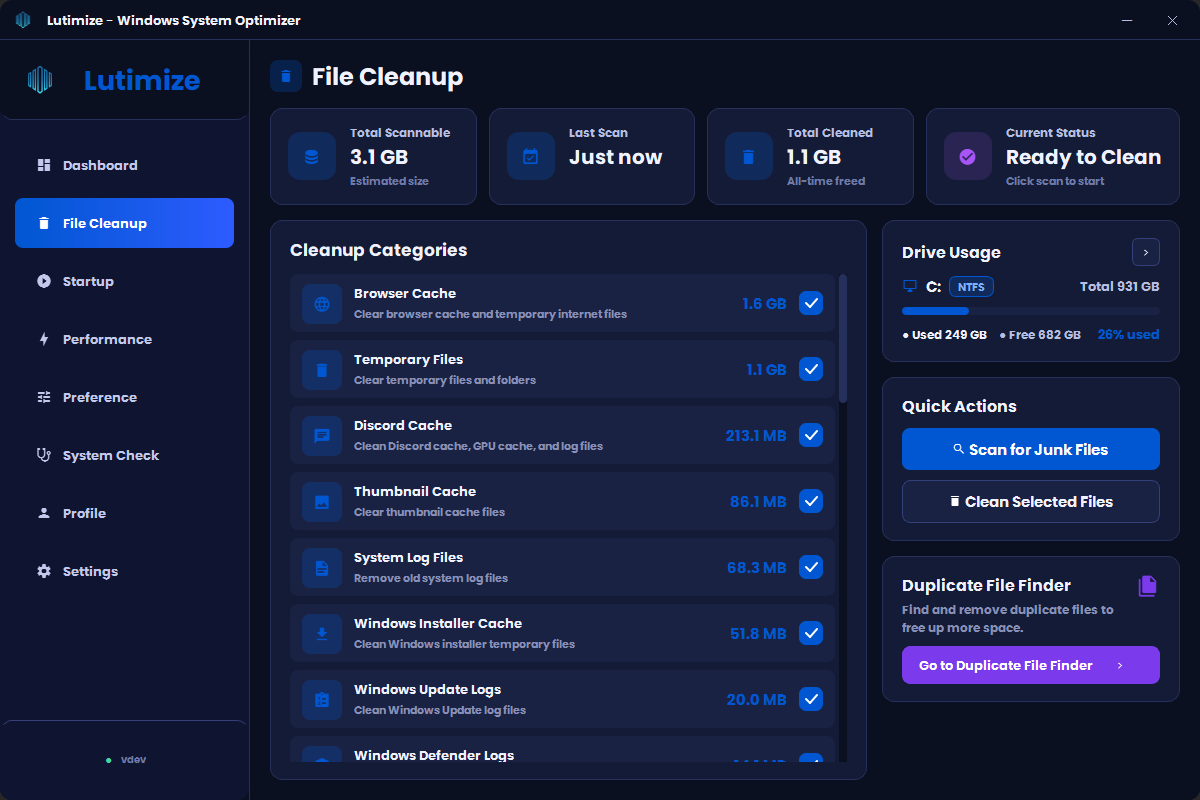
Clear Out Useless Space-Hogging Files in One Go
It clears out files that pile up in places you never see — browser caches, game launcher temp files, logs left behind by Windows, and more — all at once. It never touches your important documents or photos, so you can rest assured.
Items Cleaned (47 in total)
Browser Cache
Temporary files piled up in Chrome, Edge, Firefox, and more
Game Launcher Cache
Steam, Epic, Battle.net, Riot, Nexon, STOVE, and more
Windows Temporary Files
Update cache, Recycle Bin, system logs, thumbnails
Discord & Minecraft
Caches for frequently used programs are categorized separately, too
Duplicate File Finder
Automatically finds the same file saved across multiple folders
Previous Windows Folder
Windows.old left behind after a Windows update (can free up several GB)
How to Use
- Check the Items You Want All items are selected by default. If there's anything you don't want cleaned, just uncheck it.
- Click the "Start Cleanup" Button Press the large blue button at the bottom and cleanup starts automatically in the background.
- Check the Results When it finishes, you'll see how much space was reclaimed this time, and it's automatically added to the "Total Space Reclaimed" on the dashboard.
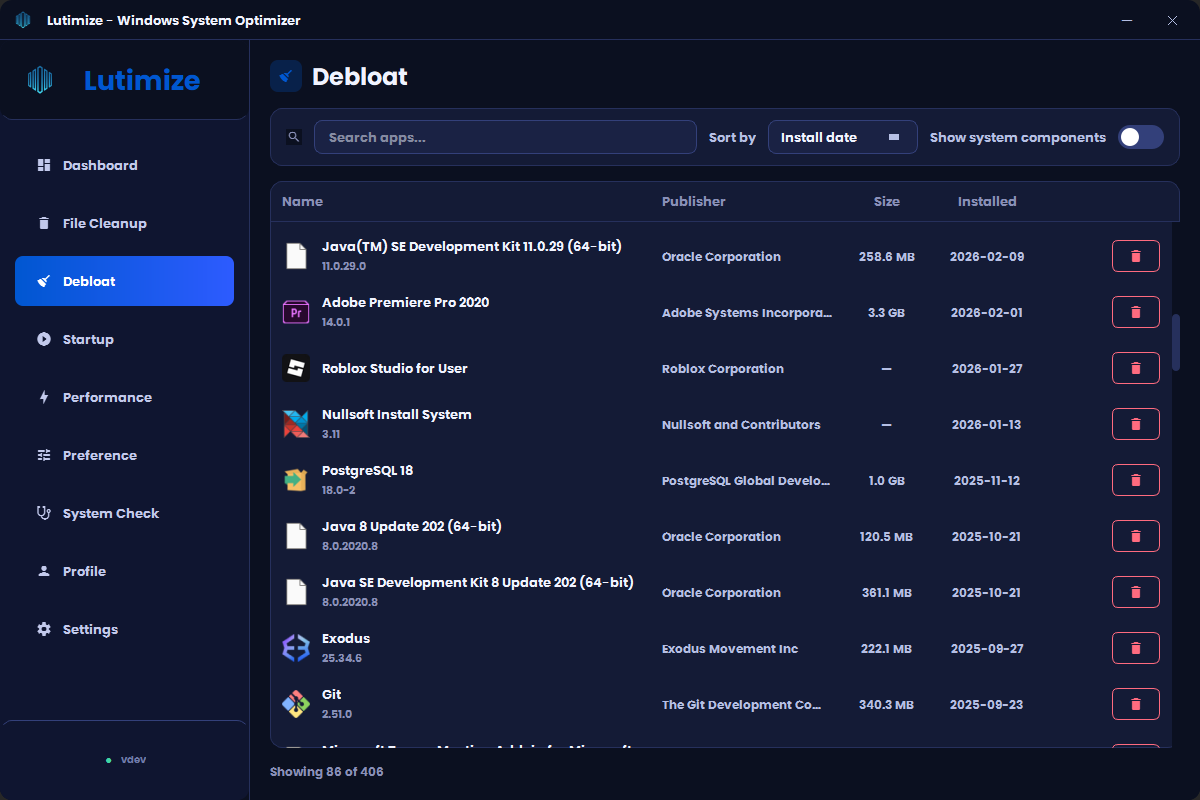
Cleanly Remove Rarely Used Default Apps & Bloatware
You can review and remove rarely used apps — preinstalled by Windows or bundled by your PC maker — all from a single screen. Since the list is gathered automatically, you can clean them up with a single click without digging through the Control Panel one by one.
What This Screen Shows
Auto-Collected Installed Apps
Automatically finds Windows default apps and programs installed on your PC and lists them with their real icons.
Publisher & Built-in Badge
Shows each app's publisher and version, and built-in Windows apps carry a badge so you can tell them apart at a glance.
One-Click Removal
Click the red trash icon to the right of an app once and removal begins.
Safe Removal Method
For apps that can't be removed silently, it launches the standard uninstall wizard to delete them safely.
Lutimize Self-Protection
The removal button is protected in the list so you don't accidentally delete Lutimize itself.
One at a Time
During a removal, other removal requests are locked out so they don't overlap, ensuring stable processing.
How to Use
- Find Apps to Remove Look through the list for default apps or manufacturer-bundled apps you rarely use. It's best to start with apps whose name or publisher is unfamiliar.
- Click the Trash Icon Press the red trash icon to the right of the app to start removal. Apps are processed one at a time.
- (If Needed) Proceed Through the Uninstall Wizard For apps that don't support automatic removal, the standard uninstall window appears. Just follow the prompts.
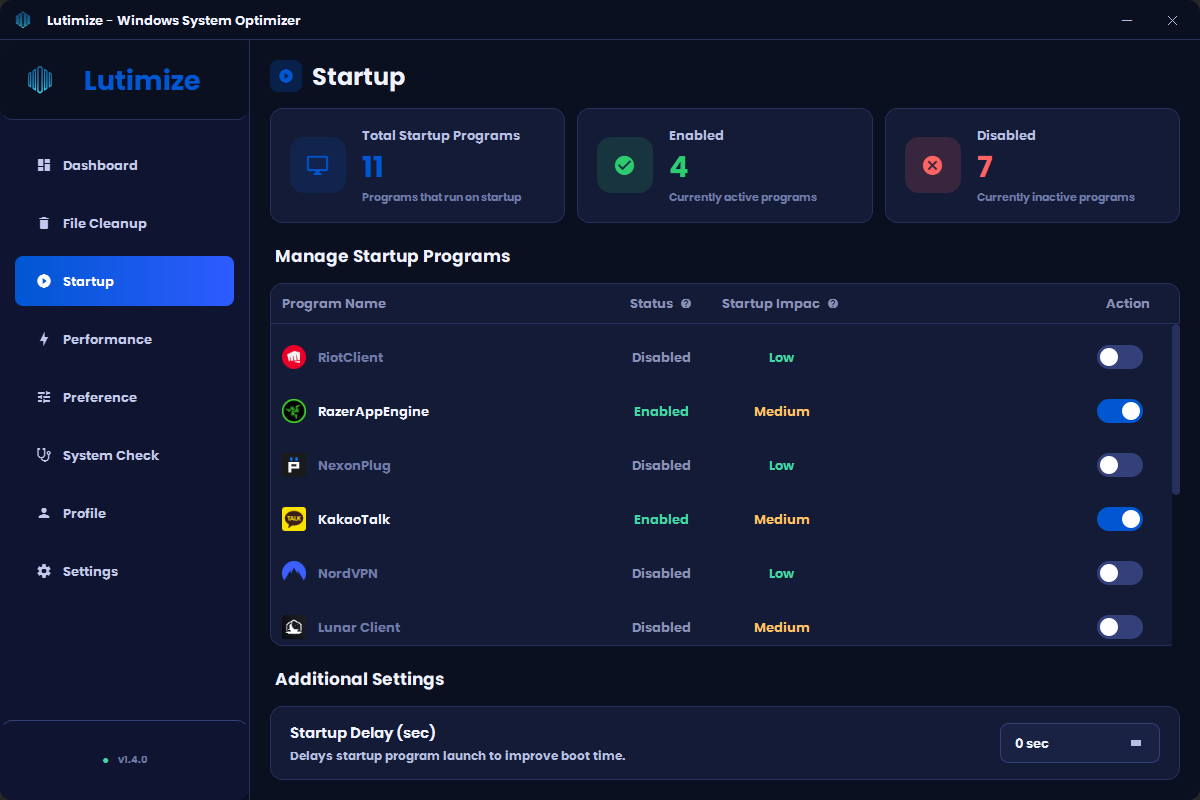
Slow to Boot? — Clean Up Your Startup Apps
The programs that launch automatically every time Windows starts are the biggest culprit eating up your boot speed. Lutimize finds all registered startup apps and gathers them on one screen, letting you turn off just the unnecessary ones with a single toggle.
What This Screen Shows
Total Startup Apps
Tells you the total number of programs registered to run at boot.
Enabled Programs
Check at a glance how many startup apps are currently turned on.
Disabled Programs
The number of currently disabled startup apps is shown as well.
Startup Impact
Shows how much each program burdens boot speed, classified as Low/Medium/High.
Toggle On/Off with One Tap
Just press the switch on the right and it applies instantly. The program itself is not deleted.
Startup Delay
Delays the launch of all startup apps by N seconds to reduce the load right after boot.
How to Use
- Find Unnecessary Programs in the List Turning off programs with Medium / High impact that you rarely use gives the biggest effect.
- Disable with the Toggle on the Right Press the switch and it applies immediately. The program isn't deleted — only "auto-start" is turned off, so you can turn it back on anytime.
- (Optional) Configure Startup Delay Enter a value in seconds in "Startup Delay" at the bottom, and the enabled startup apps will launch that much later after boot, spreading out the initial load.
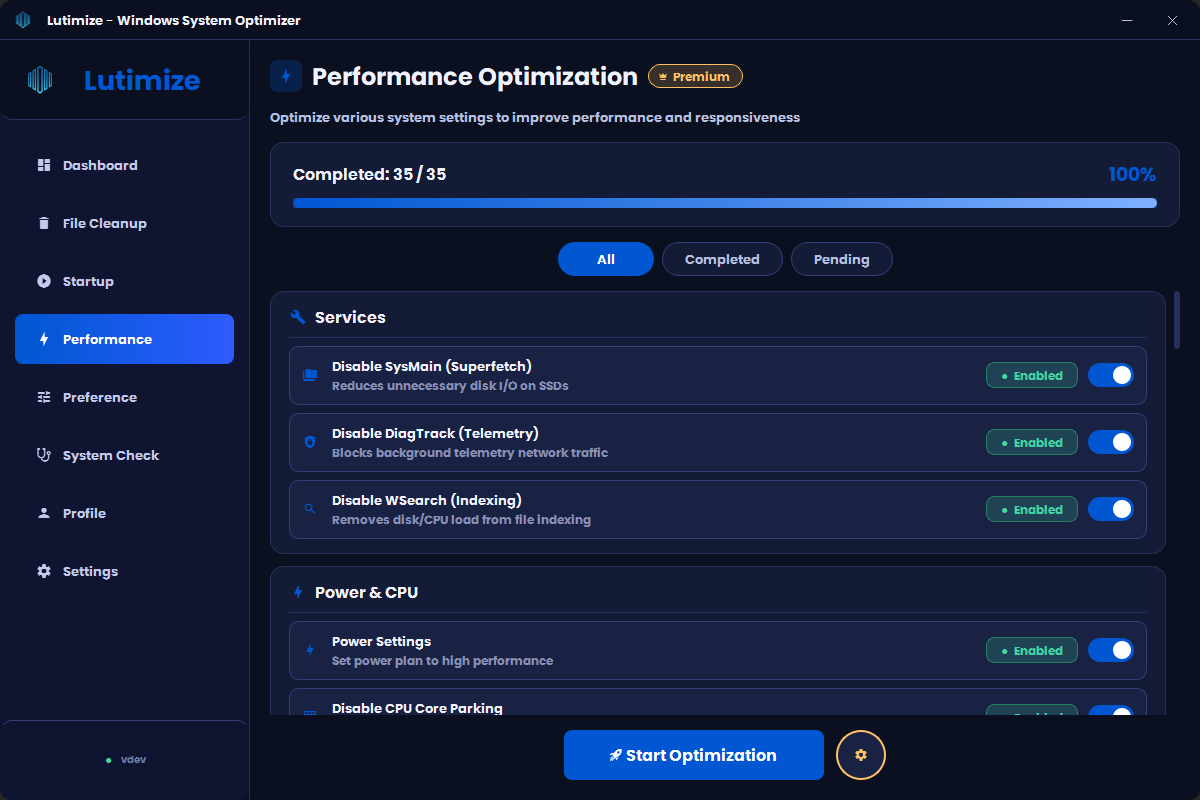
Boost Game FPS, Boot Speed & Internet Responsiveness
It adjusts even the deep settings Windows usually leaves untouched, all at once, to make your PC run faster. You'll notice less stutter while gaming, shorter boot times, and snappier internet responses.
Key optimization items (45 total)
Game Mode & Visual Effects
Prioritizes system resources while gaming and removes unnecessary animations
Network, NIC & DNS
Applies settings that lower internet response time and game ping all at once
High-Performance Power Plan
Changes settings so the CPU always runs at maximum performance
Memory & Disk
Optimizes memory management and disk write caching
Disable Telemetry
Blocks data that Microsoft collects in the background
Premium-Only Options
Extra items like disabling location tracking + batch optimization in about 5 seconds
Risk levels & applied status
Each item shows a risk badge (Safe / Caution / Danger) alongside its applied status (applied / not applied). The "Enable All (except Danger)" button turns on every item except Danger-tier ones in one click.
Restore defaults (undo)
Reverts applied optimizations to Windows defaults. "Restore Defaults" only reverts items whose toggle is on, so leave an item toggled on if you want it reverted. To revert just the Danger-tier items (GPU-level tweaks and the like) in one go, use the "Revert Danger Items" button — it works regardless of toggle state. Power options are restored to Balanced (the Windows default), and a system restore point is created before optimization starts.
How to Use
- Select Optimization Items Use the "Enable All (except Danger)" button to turn on all Safe and Caution items at once, or use the toggle-all button and per-item toggles to pick exactly what you want.
- Click the "Start Optimization" Button System settings are changed automatically. Progress is shown in real time.
- Restart Recommended Some items take full effect only after a reboot. Please restart once if you can.
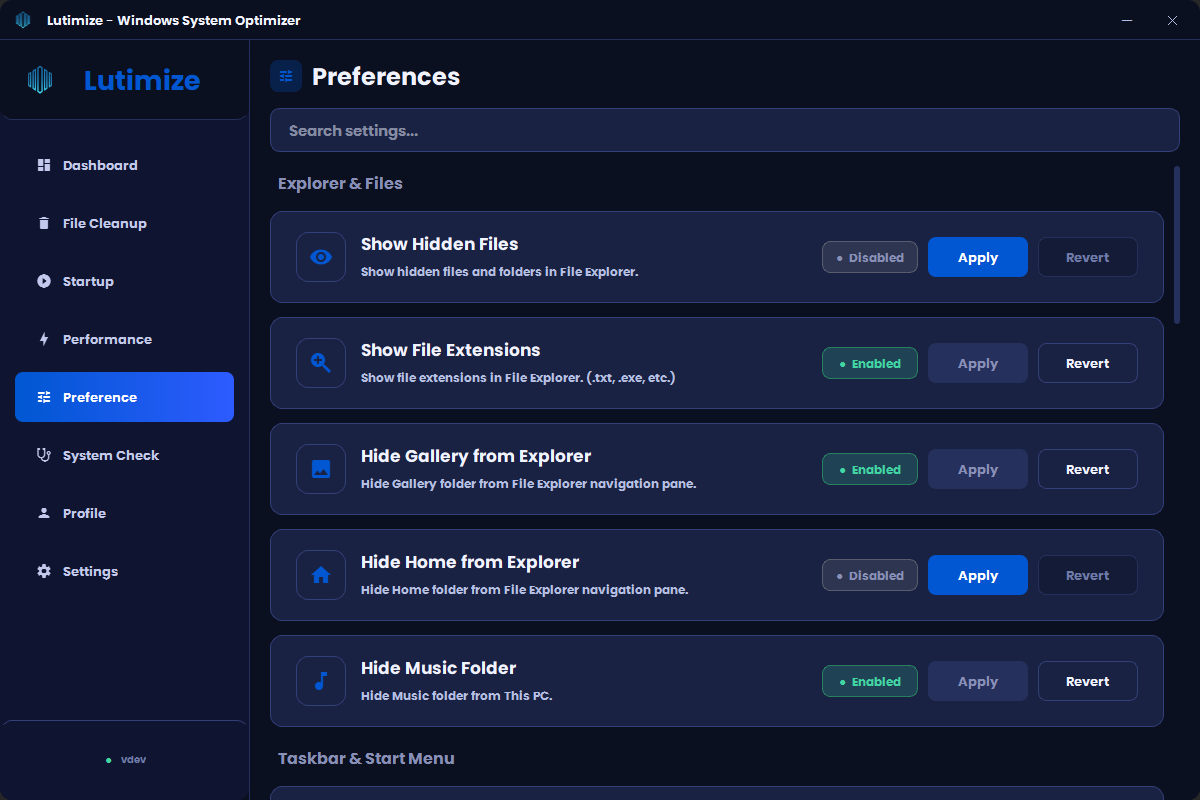
Windows' Hidden Settings, All in One Place
Hard-to-find Windows settings like disabling Cortana, turning off IPv6, and removing mouse acceleration can all be switched ON/OFF with a single toggle. Advanced features like maximum monitor refresh rate and per-game CPU/GPU profiles live here too.
Key Settings
Disable Cortana
Completely turns off the unused voice assistant to reduce background load
Disable IPv6
A setting that reduces ping spikes in some games
Disable Mouse Acceleration
Essential for maintaining consistent aim in FPS games
Max Refresh Rate
Raises your monitor to its highest supported refresh rate (e.g. 60→144Hz). If you don't confirm within 15 seconds, it reverts automatically.
Game Profiles (CPU & GPU)
Assigns high CPU priority and the high-performance GPU to the games you choose, boosting in-game performance.
Show File Extensions
Always shows file extensions (.exe, .pdf, etc.) for all files in File Explorer
How to Use
- Find the Item You Want Scroll through and find the setting you want to turn ON/OFF.
- Change Instantly with a Toggle Click It applies the moment you press the switch. Press again to restore the original setting.
- Settings Persist The settings you change persist even after you reboot your PC.
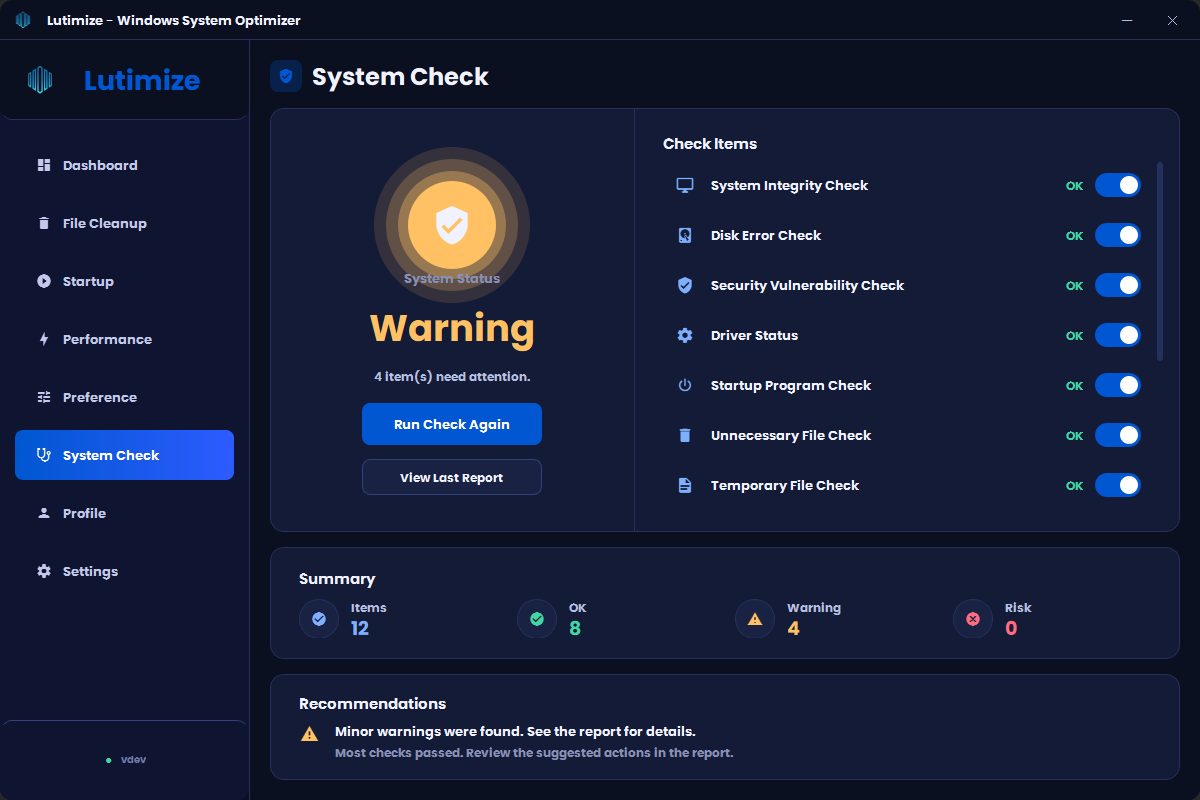
Automatically Check Whether Your PC Has Problems
It automatically checks whether Windows internal settings are misconfigured, whether abnormal processes are running, and whether there are any RAM or GPU compatibility issues. If a problem is found, it also attempts to repair it automatically.
Check Items
Registry Integrity
Checks for traces of changes made by malware
Abnormal Processes
Detects processes with suspicious names or odd locations
RAM & GPU Compatibility
Pre-checks for hardware conflicts before applying optimizations, and flags RAM installed in single channel
Laptop Environment Check
Checks laptop-specific items such as battery mode and power-saving settings
Auto Repair
If a problem is found, safe items are repaired automatically right away
Detailed Report
Clearly organizes the items found and how they were handled
How to Use
- Click the "Start Check" Button Just press the button with no other configuration, and a full check starts automatically.
- Check the Results A ✓ (normal) / ⚠ (caution) / ✗ (problem) mark appears next to each item.
- Auto Repair Runs Items where a problem is found are repaired automatically within a safe range.
Frequently Asked Questions
Do I really have to grant administrator privileges?
Could my photos or documents be deleted?
What if my PC acts strange after optimization?
How often should I use it?
My antivirus shows a warning when I run it. Is it okay?
What is Lutimize Pass?
Get Started Right Now
Download Lutimize and just follow the guide above once. You'll feel a clear difference in the speed of a PC that used to frustrate you.